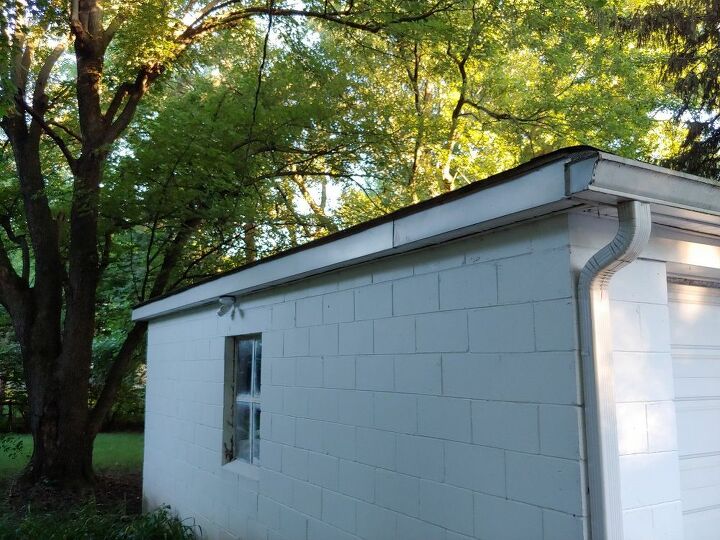
Diy Gutter Installation On Detached Garage

Rain Gutters How To Install Gutters Seamless Gutters Gutter

Leafguard Gutter Installation Completed November 2017 Our Technicians Dustin Jay Tanner Installed Leafguar Atwater How To Install Gutters Seamless Gutters

My Blog In 2020 How To Install Gutters Diy Gutters Gutters

Gutters Design Ideas Pictures Remodel And Decor House Exterior Garage Design Detached Garage Designs

Rain Gutters How To Install Gutters Rain Gutters Seamless Gutters

Leafguard Gutter Installation How To Install Gutters Seamless Gutters Installation

Project step by step 20 cutting the gutter.
Diy gutter installation on detached garage. Installing gutters can help guide the water away from your garage keeping it nice and dry and avoiding all of these potential issues. Gutter installation is a fairly simple diy project but professional installation is so affordable that it may not make the cost savings significant enough compared to your time and labor. With all the necessary fittings attached to this length of gutter install a hanger bracket every 2 to 3 ft. Tip the hooked end of the bracket under the front flange and press the remaining end over the back fo the gutter.
Just hook the bracket under the front lip of the gutter and then screw the other side of the bracket to the fascia. Landscaping is hard to establish and even harder to maintain so don t let a gutter less garage be the downfall of your precious hard work. Leave the old spikes in place a spike head looks better than a hole in the gutter. For a reasonable fee fabricators extrude so called coil stock most commonly finished aluminum right on your property forming seamless gutters that when installed are stable and leak free.
Choose the appropriate color for the home to which you are planning to affix the gutters. Cut a two inch long notch in the front lip of the gutter with tin snips to join a rain gutter section. With help lift the gutter in place and secure the corner first screwing the bracket into the roof s fascia. Feed the stock in to the machine indicating the size of gutter you wish if you have a combination machine that allows this specialization.
Install gutters to avoid ruined landscaping. To produce the seamless gutters place the stock material on the coil holder. It s much easier to join sections on the ground than to work from the top of a ladder. Is this job easy for diy.
Snap the sections together. How to install gutters on a detached garage.

26 Striking Concepts For Shedgutters How To Install Gutters Gutters Downspout

Half Round Gutters Creative Seamless Gutters In 2020 Gutters Seamless Gutters Diy Gutters

Exposed Rafter Tails And Gutters Exposed Rafters Bungalow Exterior Rafter

Installing Underground Conduit Between House And Detached Garage For New Electrical Service And More Outdoor Electrical Wire Detached Garage Installation

Rain Diverter Over Door Diy Gutters House Exterior Rain Diverter

Copper Gutters House Gutters Copper Gutters House Exterior

Metal Roof And Half Round Galvalume Gutter Installed By Mullet S Aluminum Metal Roof Metal Roofing Systems Corrugated Roofing

Our Metal Shingles Help Accent Any Building From Homes To Detach Garages They Add Both Character And Charm With Images Metal Shingles Metal Roof Shingling

Round K Style Seamless Gutters Gutter Colors Gutters House Exterior

Leafguard Gutter Replacement Window Well Gutter Installation

Suzanne S Edina Mn Leafguard Gutter Project Outdoor Living Homeowner She Shed

Gutters Ann Arbor Mi Gutters House Exterior How To Install Gutters

Leafdrop Downspout On A 6k Gutter Gutters Shutters Blinds

White Gutters Post Frame Post Frame Building Gutters Attica

Our Technicians Installed Leafguard Gutters And Downspouts Over The Home S Back Deck For A Continuous Seamless Run A L Seamless Gutters Rain Gutters Gutters

Installing Underground Conduit Between House And Detached Garage For New Electrical Service And More In 2020 House Wiring Installation Electricity

11 Elegant Metal Roofing Gutters Ideas Roof Styles Patio Roof Garage Plans

Modern Farmhouse Board And Batten Dark Brown Gutters On White House Modern Farmhouse Home Modern Farmhouse Exterior Modern Farmhouse Plans Modern Farmhouse
Https Encrypted Tbn0 Gstatic Com Images Q Tbn 3aand9gcrqhsmboh5x3afc9nzh8o Zg2y50z9huo38mvsskjnb91q6b4yq Usqp Cau

Leafguard Gutters Installed On Newly Built Walk Out Rambler In Annandale Minnesota Seamless Gutters Installation Gutters

Pin On Shutters

Upcycled Damaged Rain Gutters From Hurricanesandy Were Upcycled Into Rain Gutters Reducereuserecycle With Images Rain Gutters Gutters Detached Garage

050g 0116 3 Car Garage Plan With Flex Space In 2020 Detached Garage Designs Garage Plans With Loft Car Garage

Slide 3 Seamless Gutters How To Install Gutters Rain Gutter Installation

Leafguard Gutter System Installed On New Construction Lake Home How To Install Gutters Seamless Gutters Installation

Get Unique And Decorative Gutter Ideas From The Experts Of Sunshine Gutters Pro And Enhance Your La Gutters How To Install Gutters Gutter Drainage Solutions

The Buenos Aires Installed Garage 20x40x12 Big Buildings Direct Garage Design Garage Door Design Garage Doors

Garage Floor Remodeling Garage Door Design House Awnings Garage Exterior

24 24 Double Garage Plans In 2020 With Images Double Garage Plans Garage Plans Detached Garage Plans
How To Install Gutters On A Detached Garage Hometalk

Leaf Guards Installed By Tn Seamless Gutters Seamless Gutters Gutters Leaf Guard

Garage Plans 2 Car Garage Plan With Mezzanine 062g 0072 Garage Plan Backyard Garage 2 Car Garage Plans

Rainpro Seamless Gutters Seamless Gutters Raingutters Leafguard Minnesota Fargo Southdakota Gutters Seamless Gutters Leaf Guard Rain Gutters
Awesome Photo Take A Look At Our Article For Additional Inspiring Ideas Seamlessgutters In 2020 With Images Rustic House How To Install Gutters Gutters

Leafguard Gutters Huron South Dakota Gutters How To Install Gutters Seamless Gutters

How Much Did It Cost To Replace Or Install Your Rain Gutters Downspouts How To Install Gutters Gutters Cleaning Gutters

How To Install A Ceiling Fan A Diy Guide So Simple Anyone Can Do It Home Maintenance Home Repair Diy Home Repair

Www Lsl Com The World S 1 Most Visited Video Chat Community Detached Garage Garage Apartments Loft Plan

Pin On Garage

Pin By Victoria Ott On Lady Merriam Sir Ronno Find A Home Building A Garage Garage Prices Car Garage

White Seamless Aluminium Gutters Ral 9016 Gutters House Exterior Painting Gutters

Installing Trusses On A Detached Garage Roof Truss Design Roof Trusses Roof Construction

